
Mounting Options & Hanging Tips for Every Print Type
- May 15
- 2 min read
Updated: May 19

Choosing the right mount does more than just support your print. It affects how it sits on the wall, how modern it feels, and how easy it is to install. Here is a clean breakdown of mounting options for each print type, plus practical tips to hang them the right way.
Metal Prints
Metal prints offer the most versatility when it comes to mounting styles. Each option changes the look and spacing from the wall.

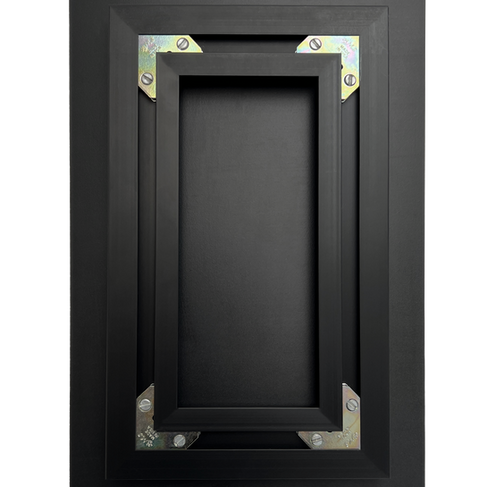
Float Mount
Creates a floating effect by spacing the print slightly off the wall. This gives a clean, gallery-style presentation and works well in modern spaces. For 8x8 to 20x30.

EZ-Stick Tape
Each print features a distinctive, double-sided, re-adherable adhesive, allowing you to seamlessly affix and adjust your HD Metal Prints on any clean, smooth, or textured wall surface—damage-free. For 4x6 to 12x18.

Aluminum Mount
A sturdy backing frame attached to the print. This is one of the most durable options and includes a wire hanger for easy installation. For 8x8 to 48x96
Flush Mount
Sits closer to the wall with minimal spacing. It is a more subtle, low profile look compared to the float mount. Also uses a wire hanger for hanging. For 8x8 to 48x96
Hanging Tip for Metal Prints
Use wall anchors if you are not drilling into studs, especially for larger sizes. Always check that your wire is evenly tensioned so the print hangs level.
Acrylic Prints
Acrylic prints keep things sleek and polished, and their mounting is designed to match that clean look.


Aluminum Mount (with Wire Hanger)
Provides strong support behind the acrylic while keeping the focus on the glossy front. The included wire hanger makes installation straightforward and secure. The aluminum comes in a black and silver finish. For 8x8 to 48x96
Hanging Tip for Acrylic Prints
Because acrylic has a reflective surface, hang it at eye level and avoid placing it directly across from strong light sources to reduce glare.
Canvas Prints
Canvas prints keep mounting simple and classic.

Wire Hanger
Installed on the back of the wooden stretcher frame. This allows for quick and easy hanging with a single nail or hook.
Hanging Tip for Canvas Prints
Use two hooks instead of one for larger canvases to prevent shifting over time. This keeps the piece level and stable.
Paper Prints
Paper prints are a bit different since they are not mounted on their own.

Frame Required (No Mount Option)
Paper prints must be placed inside a frame for proper support and protection. This also allows you to customize the final look with different frame styles and matting options.
Hanging Tip for Paper Prints
Choose a frame with a sturdy backing and a wire hanger or sawtooth hardware. Adding a mat not only enhances presentation but also prevents the print from touching the glass.
General Hanging Tips for All Prints
Eye Level Rule: Aim to center your artwork about 57 to 60 inches from the floor
Spacing: Leave 2 to 3 inches between multiple prints for a clean gallery look
Leveling: Always use a level, even if it looks straight by eye
Weight Matters: Heavier pieces need anchors or studs for proper support
Test Before Final Placement: Use painter’s tape to map out placement before committing to nails


Comments